TimelineFX Documentation
Introduction
TimelineFX is an application developed by RigzSoft that will help you create a miriad of particle effects that you can either use dynamically within Blitmax nd Monkey, or export to spritesheets for use in just about anything. Visit www.rigzsoft.co.uk for more information, join the community and download effects libraries and shapes for all your particle needs.
Special thanks goes to Bruce Henderson (Brucey) for his amazing array of Blitzmax Modules, Garritt Grandberg (gman) for the zipengine module, Manel Ibanez (Ziggy) for an amazing IDE and Mark Sibly creator of Blitzmax, the language used to make TimelineFX.
Getting Started
To start with, just load an effects library and play about with some of the effects. Timeline particles comes with a few libraries to get you started and show off some of the capabilities of the particle engine and editor.
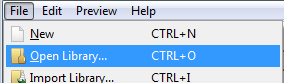
Begin by going to the file menu and selecting Open Library. Within the installation folder of TimelineFX you will find a Library called "ExampleEffects"
The library then loads in the editor, so you should now see the list of effects in the list box. Click on any effect and it will begin to play in the preview window. To restart an effect, double click in the preview window. Try clicking and dragging the effects about.
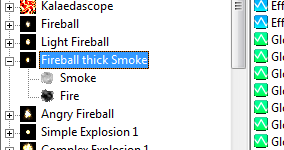
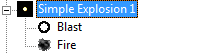
You can take a look at how each effect is controlled by double clicking on the effect in the treeview to open up and see the emitters that it's comprised of. You can also click on the attributes of each effect and emitter to see the shape of each graph and how it controls the behaviour of each particle over time. Let's take a look at the effect called simple explosion. Double click on the effect in the treeview to show the emitters it uses.
As you can see it has 2 emitters - Blast and Fire. If you click on each emitter then only that emitter will be played in the preview window. This is useful to isolate emitters so you can work on them more easily. By doing this you should see that the blast emitter emits a single particle that looks like a blast wave, and the Fire emitter emits a number of smokey particle shapes to look like fire. Lets look in detail at the Blast emitter first
Make sure the Blast emitter is selected and then click on the Particle tab. On the Particle tab you can see the shape that the particle uses to make it look like a blast wave and its colour is set to white for the duration of its lifetime. The most important setting for this particular emitter is that it is a Single particle and it is One Shot. This means that only one particle will be emitted and that it will play out its life just once. Its handle is set to the centre so that it emits properly to encompass the explosion. The angle settings are unimportant for this emitter as the shape is such that it will look the same at any angle.
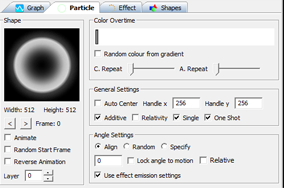
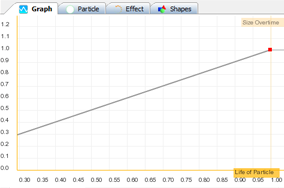
Looking at what the blast wave does, it simply grows in size and fades out over time. To do this 3 of the attributes were used: Size, Size Overtime and Alpha Overtime. Click on the Size attribute in the Attribute list and make sure the Graph tab is selected (it should do this automatically when you click on any attribute). You can see that the graph has one node and that it is set to a size of 850; this is the base size that is scaled using the Size Overtime attribute. Select the Size Overtime attribute and look at the graph. You can see that it has 2 nodes, one at 0 at the beginning of the particle's life and the other set to 1 at the end of the particle's life. So this means that over the life time of the particle its base size is scaled from 0 to 1 making it slowly grow in size. You will see something similar on the Alpha Overtime attribute. On that attribute there are also 2 nodes but this time the first node at the beginning of the particle's life is set to one, and the other at the end of the particle's life is set to 0. This means that over the particle's lifetime the visibility of the particle will slowly decrease from 1 (opaque) to 0 (transparent) making it slowly fade out.
Try swapping them round so that the first node is set to 0 and the second to 1. You will see that rather then fade out, the particle will fade in and abruptly dissapear when the particle dies.
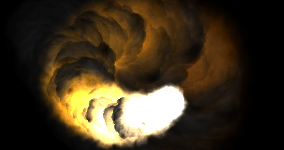
Next let's take a look at the Emitter called Fire. Select it in the effect library list and take a look at the Particle tab. This time you can see that the particle looks like a smoke cloud. Looking at the colour overtime we can see that it changes a lot more over time then the Blast emitter. It starts off white, then changes into orange, then to grey to give it a smokey look at the end. The particles are set to additive to make them a lot more vibrant and the angle settings are set to random with a range of 360 degrees so that the fire particles will spawn at random angles. It's also worth noting that the "Use effect Emission Settings" is checked; more on that in a moment.
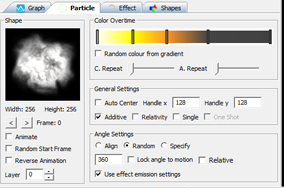
Next we can take a look at the attributes this emitter uses. Similar to the blast wave, it also increases in size over time with the exception that if you look at the Size Overtime attribute you will see that it scales up to its base size very quickly - it starts of at 0 and at about 15% of the particle life it's already at full size. Select Velocity and you will see one node set to about 180, so the particle can move should the Velocity Overtime attribute allow it. Click on the Velocity Overtime attribute to see how that base velocity is scaled. You will see that it starts at a value of 1, meaning it will be moving at its full base speed (180 pixels per second), but quickly decreases to 0 within half of the particle's lifetime. This, combined with the size over time, gives a dramatic size and movement away from the centre, just like an explosion. Looking at the Alpha attribute you will see that just like the Blast emitter, it also fades out over time. Finally, the last attribute utilised by this effect is Amount. Click on the amount attribute and you can see that the graph has 2 nodes; the first is set to 500, which quickly reduces to 0 within half a second. This allows the effect to quickly emit a number of Fire particles but only for a limited time so that we don't get a continuous stream of fire.
So how do the particles know which direction to move in? That brings us on to looking at the effect settings.
We mentioned before that the "Use Effect Emission Setting" was ticked. This means that the Effect Attributes control the direction that the particles initially travel in. Select the Simple Explosion effect in the Library list, and click on the attribute called Effect Emission Range. On the graph you will see 1 node set to 180. This means that the particle can travel anywhere from -180 to 180 degrees in direction either side of the emission angle, so a full 360 degrees is possible. Try changing the node to 0 on the graph; you will see that now the Fire emitter travels only in 1 direction, making a fat column of fire. If you also change the velocity to a much higher value, this column of fire will become even more obvious.
And finally lets take a quick look at the Effect tab. Click on the Effect tab and take a look at the settings. You will see that this effect is a "Point" effect, so all particles will be emitted from a single point. The other settings are mostly greyed out, as they don't apply to point emitters, but we can take a look at those in more detail later on. Each setting is also covered in "Effect Properties".
Try selecting other effects and just get stuck in. Try playing around with the different settings and learning how the different attributes can change the look of the effect.
The Interface

1 Toolbar
The toolbar for various shortcut buttons including loading, saving, copying and pasting.
2 Effects Library
Each effect contained within the currently loaded library is listed here as a hierarchy
3 Attributes
This list represents different attributes that an effect or emitter can have. Each attribute represents a graph where the attribute can be controlled over time.
4 Property tabs
- Graph Tab The graph tab is where you can draw how the particle effect behaves over time using a line graph. The graph can contain nodes that either create linear lines or bezier curves for smoother results.
- Particle Tab Each effect contains particles that can be controlled over time and with this tab you can adjust various properties of the particle including its shape, colour, angle and various other aspects.
- Effect Tab This tab allows you to adjust settings for the effect as a whole, such as the effect type (point, area, ellipse and line) and loop settings amongst other properties.
- Shape Tab The shape tab is where you will find all the different shapes contained within the library.
- History Tab Finally the history tab shows a list of all the recent changes of an effect allowing you to revert changes
5 Preview
The preview area is where you can see how the effect looks, and is updated in realtime as you change the particle effect settings and attributes.
6 Status Bar
The status bar keeps you up to date with a few bits of information such as the current effect being edited and the number of particles currently in use.
The Menus
File Menu
- New Discards the current library and creates a new blank one.
- Open Library Discards the current library and loads a new one.
- Import Library Opens the import library dialog and allows you to load some or all effects from another library. Any shapes used in the imported effects are automatically imported as well.
- Save Save the current library.
- Save as... Save the current library using a different name.
- Import Animation Import a bitmap animation into the shape list. Animations need to be in the format of either .png (compressed bitmap file with alpha) or .tpa (timeline particles animation format). If you choose to load a .png file then a further dialog box opens asking for information regarding the number of frames in the animation and the size of each frame. This is not required for loading .tpa files as that information is contained within the file.
- Import Shape Import a bitmap shape into the shape list. Shapes must be in the format of .png. Shapes can also be imported by dragging a file from any file manager onto the shapes tab.
- Exit Exit the program
Edit Menu
- Undo Undo the last change you made to an effect
- Redo Redo the last change you made to an effect
- New Cut the current effect or particle to the clipboard.
- Copy Copy the current effect or particle to the clipboard.
- Paste Paste the effect or particle. Effects can be pasted either as a new effect within the library or as a sub effect of a particle. See the advanced topic "Creating Sub effects". Particles can be pasted under effects only.
- Clone This will make a copy of the particle or effect within the library hierarchy.
- Rename Rename the currently selected effect/emitter/folder
- Move Up/Move Down Move the currently Selected item up or down in order. This helps to organise your effects, emitters and folders a bit more easily. Items can only be ordered within their current hierarchy.
- Add Effect Add a new blank effect to the library. New effects can also be created as sub effects of particles.
- Add Particle Add a new blank particle to the current effect.
- Add Folder Add a folder to the effects library. This is useful for organising your effects into groups. To move an effect into a folder, simply click and drag the effect onto the desired folder, or alternatively cut and paste the effect. Only effects can by put into folders. Folders can only be created at the root level of the tree view, folders cannot be created within effects or emitters.
- Delete Delete the current effect or particle.
- Hide Unselected Emitters When selecting an emitter within an effect, if this option is ticked then other emitters will be hidden allowing you to see the currently selected emitter more clearly. Sometimes however it can be useful to see the changes you make to an emitter within the context of the whole effect, so just uncheck this option to make that happen.
- Animation Properties Open the animation properties of the current effect. This dialog box allows you to create a bitmap animation and save it to disk. See "Animation Dialog".
Preview Menu
- Background The background menu allows you to change the background shade so you can see how your effects look on different backgrounds.
- Zoon The zoom menu allows you to adjust the level of zoom of the preview pane.
- Create Icon This creates a snapshot of the preview pane and uses it to create an icon to represent the current effect in the effect library list. Try adjusting the zoom level to get a good shot and also try using pause to achieve better control when creating your icon.
- Pause Toggle pausing of the effect currently being played.
- Use Render Tweening Toggles a technique called render tweening. Switching this off means that the preview will no longer use tweening to smooth out the playback of particle effects.
- Update Mode TimelineFX uses 2 different ways to update particles. One way is more precise and uses interpolation to get values from the attribute graphs. The other way compiles the graphs into lookup tables for faster performance. There is very little difference visually between the 2 modes and its recommended to use Fast mode, especially when using the effects in your game. However, when adjusting graph values in Fast mode the editor has to compile the graph as you adjust it, which can result in a lack of responsiveness on slower machines. This will not not happen in precise mode as it does not need to compile on-the-fly so it may be more desirable to choose this mode on slower hardware. The responsiveness of the graphs in fast mode is generally only noticable on "Overtime" graphs that affect the particle over its lifetime and more so if the life of the particle is long and the graph uses curves.
Using the Graphs
The graph is the main tool where you can describe how the particles in an effect behave over time. The x-axis of the graph will either represent the amount of seconds passed since the effect started or the percentage of time of the particle's life in the case of "Overtime Attributes" (see particle attributes). The y-axis represents the value of whichever attribute you have selected in the attributes list, for example, amount or velocity.
 Graphs consist of nodes indicated by red squares and are joined by lines, so in essence it is a line graph. The lines and nodes show you exactly what value that particluar attribute will have at that time.
Creating nodes
To create a node simply click and drag on the graph with the left mouse button and a node will be created which you can then drag around. If it is the only node on the graph then it will be anchored to the left-most point of the graph where the x-axis will be 0. You can still change the value by moving the node up and down. Any node that you hover over with the mouse will be highlighted green, indicating that it is the currently selected node. To create more nodes just keep clicking and dragging on the graph where there are no other nodes so that one is created. To change the position of an existing node simply hover one so it turns green and click and drag it about. When moving nodes about the graph they will automatically order themselves so that the line will never loop around on itself. A small box will always be visible when changing nodes in order to show its current x-axis and y-axis values, with the x value on top and the y value below.Deleting Nodes
To delete a node, highlight the node you wish to delete and then right click to show a pop-up menu. Select Delete from the menu and the node will be removed from the graph.Resetting the graph
If you wish to delete all the nodes on a graph then right click with the mouse anywhere on the graph and select Reset Graph from the pop-up menu and all nodes will then be removed.Navigating the graph
To view other areas of the graph not in view you can use the scroll bars at the bottom and right of the graph, or you can click the middle mouse button in order alternately focus on each of the nodes on the graph. When dragging nodes around the graph you can drag them over the graph edge to make it scroll automatically in that direction to reveal more of the graph.Copying and Pasting graph data
You can copy and paste graph data from one graph to another. Simply right click the graph and select "Copy graph data" from the pop-up menu to copy the graph to the clip board. Then select the attribute graph you wish to copy the data to and select "Paste graph data" from the pop-up menu. Please note that this feature will only work when copying between graph attributes of the same type. For example you cannot copy the graph data of the Alpha attribute and paste it onto the Size attribute. But you can copy for example, from the Width attribute to the Height attribute.Zooming in and out
You can use the mouse wheel to zoom in and out of the graph to make it easier to manipulate the graph nodes. You can also change the zoom level by right clicking and selecting the level of zoom from the pop-up menu. The current level of zoom is shown in the top-right of the graph.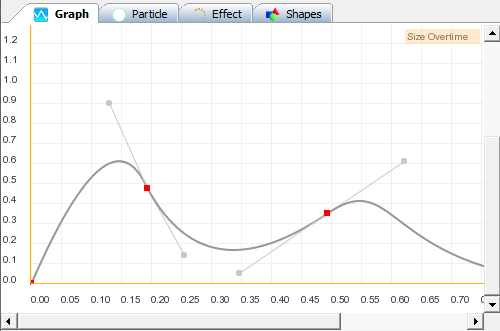
Utilizing Curves on the Graph
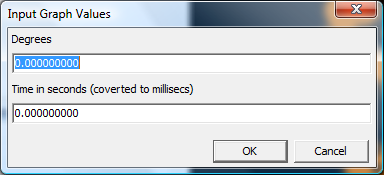
An extra feature of the graph is that you can draw smooth curves in order to make attributes change smoothly over time rather then the more rigid changes that can result from merely using normal lines. In order to do this you need to make normal nodes curve points - simply right click the node you want to be a curve and select Curve from the pop-up menu. Upon toggling the curve option, 2 extra nodes will appear next to the node attached by lines. These round nodes can be dragged about in the same way that standard nodes can, but instead they will affect the curvature of the 2 graph lines either side of the node. To change a curved node back into a normal node simply select Curve again from the pop-up menu to toggle it off.Inputting Values
Anatomy of an Effect
Effects in Timeline Particles consist of emitters contained within an effect
In the example here, the name of the effect is "Simple Explosion" which contains 2 emitters, "Blast" and "Fire". You can have as many emitters for each effect as you want. In this section we will go over each element of an effect and how it controls the outcome of the effect.
For more information on the properties of effects see Effect Properties, Particle Properties, Effect Attributes and Particle Attributes
Effect Properties
On the effect properties tab you can adjust various settings to control the effect.
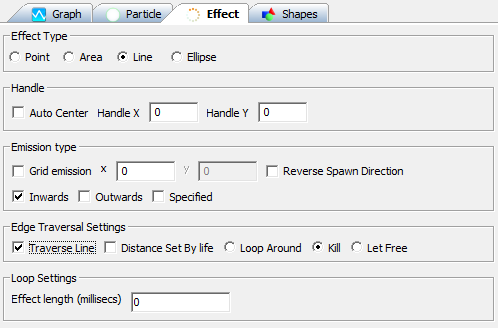
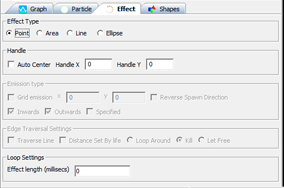
Effect Type
Effect type is how the particle spawns and can be 1 of 4 types:Point
Point simply spawns all of the particles at a particluar point on the screen. Depending on the effect you are creating, the particles may fly away from that point but they will always be created at the same point. The location of the point can be moved about at will. Try dragging around a point effect in the preview window.Area
An area effect will spawn new particles in a rectangular space as defined by its width and height attributes. The width and height can be changed over time using the graph, so an area can grow or shrink depending on the effect you are creating. See the Attributes section for more details about using the graph.Line
A line effect will simply spawn particles along a line. The length of a line is defined by the line length attribute which can also grow and shrink over time.Ellipse
And ellipse effect will spawn the particles in a ring formation, the size of which is determined by the width and height attributes.Handle
The handle of an effect lets you define the point from where the effect is positioned on screen and is subtracted from the effect's coordinates before rotation is calculated. So if you assign an area effect's handle to coordinates 0,0 then the handle will be positioned at the top left of the effect and any rotation will happen around this point.Auto Center
Ticking Auto Center will make sure that the handle is always positioned at the center of the effectHandle x / Handle y
Use these 2 fields to set the handle of the effect at an arbitrary point.Emission Type
The settings within emission type apply only to area, line and ellipse effects, they don't apply to point effects. They control how partcles with spawn within these effect types.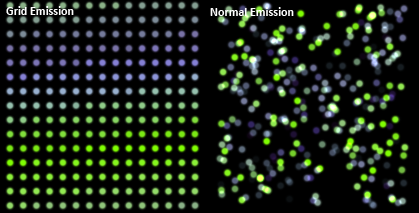
Grid Emmission
By ticking the Grid Emission check box the particles will start to spawn in evenly spaced positions across the effect. The number of points is defined by the values set in the x and y text boxes.Reverse Spawn Direction
When using grid emission, then by default particles will spawn from left to right or in a clockwise direction if using an elliptical area. Tick the Reverse Spawn Direction box to make the particles spawn in the opposite direction.Inwards, Outwards and Specified
These checkboxes allow you to control the direction that the particles will travel in when they spawn in the area. Inward means they will travel towards the center of the effect, outwards will travel directly opposite away from the centre, and specified will use the direction as specified in on the Emission Angle Graph attribute (see graph attributes). It is possible to tick both the inwards and outwards checkboxes so that the particles will alternate between travelling outwards and inwards.Edge Traversal Settings
Edge traversal settings are only available when using the line effect and enables you to create particles that will travel along the length of the line. This is ideal for effects such as laser beams. Effects with this setting also means that the particle will always remain relative to the line.Traverse Line
To enable line traversal, tick this box. This will enable the following options:Distance Set by Life
Enabling this makes the particle travel along the line according to how old it is. For example, if a particle is set to last for 1 second, then when it is 0.5 seconds old it will be half way along the line. This setting forces the particle to ignore any of its velocity attributes. It also disables the next 3 options:Loop around
Selecting Loop Around will mean that once the particle reaches the end of the line it will loop back round to the start of the line and continue from there.Kill
This option means that upon reaching the end of the line the particle will be killed.Let Free
This option will allow the particle to continue on its merry way once it reaches the end of the line.Loop Setting
Effect Length
This value determines the effect length before it loops back round to the start. The value is shown in milliseconds (1 second = 1000 milliseconds). Setting this value to 0 will mean the effect does not loop and will continue ad infinitum.
Particle Properties
A range of settings exist on the particle tab that allows you to define a number of aspects about how the particle looks and behaves.
Shape
The shape settings show the dimensions of the bitmap being used for the particle shape as well as the following options:Frame buttons
If the shape you have assigned to this particle has more then 1 frame of animation then you can use these buttons to control which frame the particle will use.Animate
Tick the Animate checkbox to make it animate if it has more than 1 frame.Once
Ticking this box makes the animation play through only once, stopping at the last frame (or the first frame if reverse animation is ticked). This is handy for animations that do not loop, such as explosions.Random Start Frame
Tick this to make the particle choose a random frame to start from. If animtion is switched off it will simply select a random frame to use when it spawns and will keep that frame over the duration of its life.Reverse Animation
If the particle is set to animate then you can tick this box to make the animation play in reverse.Layer
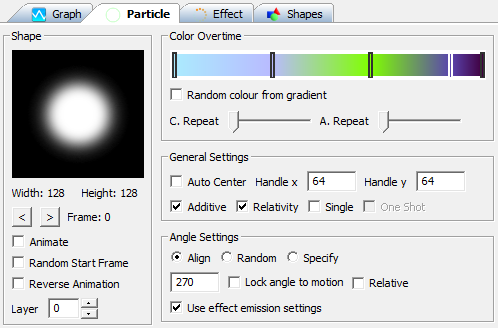
Layers are the order in which particles are drawn in the effect. If you want a particle to always be drawn on top of other particles in the effect, then make sure they are on a layer above. There are a maximum of 9 layers (0-8)Color Overtime
The colour overtime bar shows how the particle's colour changes over the duration of its lifetime. The colour bar contains notches that represents a colour and can be slid along the length of the bar. To add a new notch, right click on the colour bar to activate the pop-up menu and select "Add". A colour picker dialogue will appear where you can select your desired colour. By default the first notch will be placed at the beginning of the bar and cannot be moved. To delete a notch, right click it and select delete or select Clear All to delete all notches. To edit the colour of a notch, right click it and select edit to select a new colour from the colour dialogue that appears.Changing the hue of the colour bar
You can also change the hue of the colour bar. Right click the colour bar and select Adjust Hue from the pop-up menu. A new dialogue will open with a slider enabling you to adjust the hue of the emitter allowing for a greater freedom of control over the colour of the effect. Once you've found the hue you want, click OK to apply the changes to the emitter.Random Colour from Gradient
Rather then have the particle change colour over time, you can instead tick this checkbox to select a colour randomly from the colour bar. The colour that is chosen remains for the duration of the particle's lifetime.C. Repeat
C.Repeat means Colour Repeat and tells the particle how many times the colour bar should be cycled during its lifetime. Setting the slider to the left will make the colour cycle just once over the particle's life, set it to the right to make it cycle up to 10 times.A. Repeat
A.Repeat means Alpha Repeat and is exactly the same as C.Repeat, except that it tells the particle how many times it should cycle the alpha of the particle. Alpha is set using the graph (see particle attributes).General Settings
Auto center
Checking this will set the handle of the particle to its centre point.Handle x/Handle y
When Auto Center is not checked use these fields to set an abritrary point for the particle's handle.Additive
Check this box to change the blend mode of the particle. If additive is checked then the colour of the particle is added to the colour underneath that which it's being drawn onto. This can create more bright effects that are good for fire and electric.Relative
Relative tells the particle whether it should remain relative to the effect. For example, if a particle is set as relative and the effect moves after particles have spawned then those particles will move with the effect.Single
A single particle is a particle that will only emit once and will last indefinately. This also means that it will not change over time and will be defined by the first nodes of its graph attributes. A single particle will also have slightly different spawning behaviour for area, line and ellipses in that the maximum number of particles will spawn instantly according the number you set in the grid fields, even if grid emission is not set.One Shot
If Single is checked then check this to spawn finite Single particles. These are exactly the same as Single particles with the exception that they will change over time time according to their graph attributes and will die normally, but no respawning will occurr.Angle Settings
Angle settings is where you can tell the particle how and at what angle it will be spawned at to start with, and can also define its angle over time.Align
Selecting align will align the particle to its emission angle as defined in either the effect's emission angle attribute or the particle's emission angle attribute, if "Use Effect Emission" is unchecked. You can offset the angle by typing in the degrees to offset by in the field directly below.Random
Random will select a random angle when it spawns. The angle range can be defined using the field directly below.Specify
Specify will make the particle spawn at the angle you specify in the field below.Lock angle to motion
You can overide the angle settings above and tell the particle to align itself according to the particle's current direction of travel. You can offset this by using the field directly to the left of this checkbox.Relative
Similar to the relativity settings above, checking this property will make the angle of particle stay relative to the effect angle. So if the effect angle is 45 degrees then the particle will be drawn at a 45 degree angle. Depending on the effect you're trying to achieve, sometimes this will be desirable. Other times it will not, so the option is provided for greater flexibility.Use effect emission settings
Check this box to allow the particle's emission range and angle to be defined by the effect. Otherwise you can have the particle define it if you want it to have separate settings. Unchecking this will make the attributes "Emission Angle" and "Emission Range" appear in the particle attributes list.Shape Tab
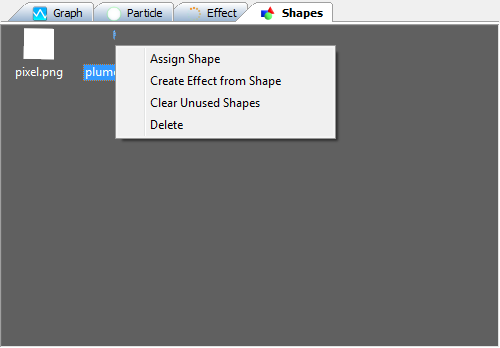
The shapes tab shows an icon list with all of the currently loaded shapes in the library. To load more shapes you can select Import Shape, or Import Animation from the file menu.
Right clicking will show a pop-up menu with the following options:
Assign Shape
Use this option to assign a shape to the currently selected emitter. If an emitter is not selected then the option will be greyed out.Create Effect from Shape
Rather then manually creating an effect, and then creating an emitter within the effect using the Edit menu, you can use this option to create an Effect with an Emitter automatically, using the selected shape.Clear Unused Shapes
In the process of creating an effect library it's quite likely that you may end up with shapes that are not used due to various experimentations. Keeping track of shapes that are no longer used can be difficult but with this option, you can simply remove all unused shapes from the library. This is a recommended option if you want to try and cut down on the file size of the library.Delete
Selecting delete will remove the selected shape from the library.History Tab
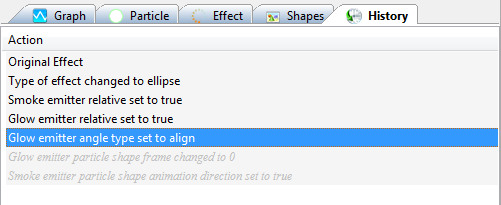
The history tab shows you a list of the all the changes you have made to an effect. To revert back to a previous version of an effect, simply click the history item in the list. The effect you are working on will be replaced with the version in the history. You can also go backwards and forwards in changes by using the edit menu and selecting Undo or Redo respectively.
There is also a pop up menu accessible by right-clicking a history item.
Clear History
This will clear the entire history from the effect. Note that this action cannot be undone.New Effect
This will create a new effect from the currently selected history item.Animation Properties
It's possible in Timeline Particles to record animations of the effects you create and save them to disk to access in other programs.
To access the Animation properties of an effect, right click the effect and select Animation Properties from the pop-up menu, or just select an effect and select animation properties from the edit menu. Doing so shows the following animation dialog window.
The animation dialogue has a number of options to fine tune how your animation will be rendered. For animations that are larger then the dialogue window use the scroll bars and zoom slider (directly below the preview) to view the animation properly.
Frame Navigation
To view each frame in the animation, simply use the slider or just type in the frame you wish to view in the text field to the right hand side of the slider.

Properties
The properties box contains the controls you'll need to adjust the animation to your requirements.
Frames
Use this field to adjust the number of frames you need the animation to have. The maximum number of frames you can have is 1024.
Width and Height
Use the width and height to adjust the size of each frame of animation. If you plan your animation to be used in computer games then it's good practice to ensure that you keep each dimension in powers of 2, i.e., 2, 4, 8, 16, 32, 64, 128, 256 and 512. The maximum size is 8192 for either width or height. Width and height are also independant, so you can have a 128 x 512-sized animation, for example. Next to the width and height box you'll find 2 buttons "-" and "+" which will half and double the size of the animation frame respectively.
X and Y
Use these fields to offset the location of the particle effect. You can also click and drag the effect around the preview box using the mouse to move it.
Seed
If an effect uses emitters that utilise variation attributes (see particle attributes) then seed will set the random seed number that the computer will use to generate the variations. This ensures that when you update the effect, the animation will look the same because a new set of random variations have not been chosen. You can change this number to generate a new variation of the effect. If you change the seed value then you will need to click update to see the changes.
Seamless
You can make an animation seamless so that it can be tiled for use in texturing and backgrounds. Simply check the Seamless check box and click update. The animation will then wrap particles on the edge of the animation to the opposite side of each frame making the animation seamless. If you make any changes to the properties of the effect you will need to click on the Update button again to make the animation seamless before exporting as an animation.
Loop Animation
It's possible to create seamlessly looped animations in Timeline Particles. To do this, make sure the Loop Animation tick box is checked. Making changes to this requires that you click update to see the changes. For best results make sure that the Frame Offset is set to 0.
Zoom
Use the zoom to scale the effect. This can be useful to ensure that the effect fits within the animation area. To zoom, either use the slider or type in the zoom amount in the text field for more precise values.
Frame Offset
You can use Frame Offset to change the frame that the animation starts from. Using frame offset can have adverse effects on looped animations. Once you change frame offset, click Update to apply the changes.
Auto Fit
To save you having to mess about with the zoom slider to try and fit the effect into the animation frame, just click auto fit and the effect will automatically be sized to fit into the animation frame size. Note that this option is not available when creating a seamless texture animation.
Play and Pause
Use these buttons to simply start and stop the animation to see it running.
Record
Once you are happy with the animation click the record button to save it to disk. Once you click it you will see the following dialogue box with some options:
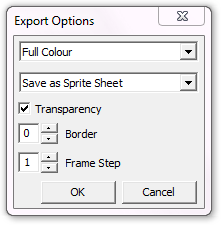
From the drop down box you can select how you would like the colours to export. There are 5 different ways to process the colours when exporting an animation:
Full colour
This will simply export the animation as you see it in the editor with full colour.
Grey Scale
Selecting this option will convert the animation to grey scale colours. This is handy if you wish to tint the animation with different colours later on when using it as either an animated particle, or in Blitmax.
1 Colour
This option will convert all colour information in the animation to white. This will create a more vibrant animation then the grey scale option.
1 Colour Alpha
This uses the grey scale version of the animation as an alpha channel, then converts all colour information to white - the same as the 1 Colour option does.
Grey Scale Alpha
Again, this option uses the grey scale version of the animation as an alpha channel but this time exports all colours converted to grey scale.
The second drop down menu enables you to choose the following options:
Save as Sprite Sheet
This will arrange the animation onto a sprite sheet where the animation is organised into columns and rows. The overall width and height of the sprite sheet will be kept in powers of 2 as long as individual frames are powers of 2.
Save as strip
Saving as a strip will save the animation as one long strip keeping all the frames of animation on 1 row.
Save frames separately
If this option is selected then the each frame will be saved as an individual file with the format filename0001.png, filename0002.png... and so on.
To save with transparency make sure the transparency tick box is checked.
Border
If you need your animation to have a border of clear pixels round the edge of each frame then you can use this field to enter the size in pixels of the border.
Frame Step
Using frame step will force the recorder to only record every nth frame. This can be handy if you need to shorten the number of frames saved in a long animation.
Once you have prepared your save options, clicking OK will then present you with the save dialogue where you can either save as a .png file or save as a .tpa file. A .tpa file is exactly the same as a .png file except that information about the size of each frame and the number of frames is saved with the file so that you don't have to remember them when importing them into the editor.
Attributes
Attributes represent different aspects of an effect that affect how the effect changes over time. Attributes can either change how a partical behaves over its lifetime, or they can define values each time a particle is created. For example, a particle can spawn with a base speed of 400, but the percentage of the speed that the particle will travel at will be defined by the velocity over time attribute.
Effects and Particles have their own sets of attributes. Effect attributes can affect all of the particles that the effect contains by scaling up or down the particle's attributes. Read the following 2 sections to find out exactly how attributes can change the behaviour of the effects you create.
Effect Attributes
Effect Angle
Controls the angle of the effect over the life time of the effect. Particles that are set to Relative will rotate according to the effect, otherwise they will only take into account the effect angle when they spawn.
Area Height and Area Width
If the effect is of an area or ellipse type then these attributes define their sizes. If the effect is a line then these attributes are replaced with line length. New particles that are created will only spawn within the area defined here.
Effect Emission Range
This specifies the range of direction that particles will spawn and travel. Each degree on the graph represents both sides of the emission angle. So for example if you set it to 10 degrees that means 10 degrees to the left and 10 degrees to the right of the emission angle equally, i.e., a total arc of 20 degrees. So setting an emission range of 180 degrees will mean particles travel 360 degrees randomly around the emission angle.
Emission Angle
Emission angle determines the direction particles will travel initially when they spawn.
Global Alpha
Alpha affects the visibility of all particles within the effect. Global alpha is a scaling factor, so a value of 1 will not affect any of the individual alpha values of particles. A global alpha value of 0.5 will halve the value of all particle alpha values. For example if global alpha is 0.5 and a particle's alpha is 1 then the particle's alpha will be reduced to 0.5 (0.5*1=0.5). Note that this attribute will instantly affect all particles within the effect.
Global Spin
Global spin scales each particle's spin attribute within the effect, thus controlling how fast the particle spins. Note that this attribute will instantly affect all particles within the effect.
Global Weight
This scales each particle's baseweigth attribute within the effect, thus controlling how much the particle is affected by gravity. Note that this attribute only affects the base weight of the particle; therefore only affecting newly spawned particles. It does not affect the particles over their lifetimes.
Global Velocity
This scales each particle's basespeed attribute within the effect, thus controlling how fast the particle can travel. Note that this attribute only affects the base speed of the particle, therefore only affecting newly spawned particles. It does not affect the partciles over their lifetimes.
Global Particle Size
This scales each particle's size attribute within the effect, thus controlling the overall size of the particle. Note that this attribute only affects the base size of the particle, therefore only affecting newly spawned particles. It does not affect the partciles over their lifetimes. By default, only particles are uniform in size, therefore in order to enable adjustment of their width and height independantly, right click on the attributes list and select "Toggle aspect" from the pop-up menu.
Global Stretch
This scales the amount of stretch each particle has. Stretch effects how much a particle is stretched based on how fast it is travelling.
Global Zoom
This attribute affects the overall scale of the effect and can be handy when adjusting how large you want the effect to be. Note that if emitters are not checked as relative, then the scale will only be adjusted at spawn time. So whatever the Zoom is when the particle is spawned, it will keep that level of zoom for the duration of it's life. Check relative on the particles tab to make the particle scale with the effect.
Global Amount
This scales the number of particles that are spawned per second for all particles within the effect.
Global Life
This scales each particle's lifetime attribute within the effect, thus affecting how long the particles last for. Note that this attribute only affects the lifetime as they are spawned and will not extend or reduce the lifetime of particles already in existence.
Emitter Attributes
Base Attributes
Base attributes are signified by the blue graph icon. Base attributes set the base level that life overtime values will scale to. The x axis of the graph represents the time in seconds the the effect has been running for. So for example, you may set the velocity to 200 at the start of the effect, then have it slowly reduce to zero over the the time that the effect has been set to run.
Life
This attribute determines how long the particle will live before before dying. You can plot points on the graph so that the life of particles will vary over the lifetime of the effect. The y axis of the graph represents the number of milliseconds that the particle will live for.
Amount
This controls how many particles per second that the emitter will spawn at that point in time of the effect running. The y axis on the graph represents the amount per second spawned.
Size
Size controls the base level that the size over-life attributes scale to. By right clicking the particle attributes list you can toggle "Uniform Size", which will enable the size attribute to split into width and height attributes so that these can be changed independantly from each other.
Velocity
This controls the base speed of the particles being spawned that the velocity over-life attributes scale to. The y axis on the graph represents the number of pixels per second that the particle will travel at.
Spin
Spin controls the base speed with which particles rotate in either direction and determines what the spin over-life scales to. The y axis of the graph represents the degrees of spin per second and has a negative and positive range, enabling you to control the direction in which it spins.
Weight
This controls the base weight of the particle that the weight over-life attribute is scaled to.
Variation Attributes
Variation attributes represent random values that are added to the base values in order to add some variation and unpredicatability to the particle's behaviour.
Life Variation
This will add a random amount of seconds onto the base attribute of life so that particles that spawn will vary in the amount of time they stay alive.
Amount Variation
This will apply variation to the base amount attribute so that the amount of particles spawned over the effect's lifetime will vary.
Size Variation
Applies a random value onto the base size so the particles spawned will vary in size. Right clicking and selecting Toggle Uniform will enable you to affect width and height variation independantly
Velocitiy Variation
This will vary the base velocity of the particle based on the amount you plot on the graph so that partcicles will spawn and move with varying speeds.
Spin Variation
This will vary the speed at which the spawned particles will rotate.
Weight Variation
Applies a random amount of weight onto the base weight of the particles that are spawned.
Motion Randomness
Motion randomness does not vary any of the base values, but it does dictate to what degree the particle will move about in a random fashion. Motion randomness effects the speed and direction of the particle so the higher this value is, the more erratically the particles will move about.
Overtime Attributes
These attributes control how the particle behaves over the lifetime of the particle. The x axis of the graph represents the lifetime of the particle so you can control exactly how the particle behaves at each stage of its life. The y axis represents a percentage of the base value set in the Base Attributes and Variation Attrbutes. So, if for example you have velocity set at 100 and the velocity overtime is set to 0.5 then the particle will be travelling at half its speed, i.e., 50 pixels per second.
Alpha Overtime
This doesn't actually scale any base attribute, it simply controls the alpha value of the particle, or how visible the particle is. The y axis is a value between 0 and 1 where 0 is transparent and a value of 1 is opaque.
Size Overtime
This enables you to control the size of the particle over its lifetime by scaling the base size attribute.
Velocity Overtime
This enables you to control how fast the the particle travels over its lifetime by scaling the base velocity attribute.
Spin Overtime
This controls the speed with which the particle spins by scaling the base spin attribute.
Weight Overtime
This controls the weight overtime of the particle by scaling the base weight attribute.
Direction Overtime
This dictates the direction that the particle travels in over its whole lifetime.
Motion Randomness Overtime
This scales the Motion Randomness attribute over the particle's lifetime so you can finely tune how erratically the particle moves.
Stretch
This attribute will stretch the particle depending on how fast the particle is travelling. The higher the stretch value the greater it will be stretched. For best results use the property "Lock Angle to Motion" so that the particle angle will align properly when it is being stretched. the example effects file called "StarBursts.eff" that comes with the editor shows a number of examples that utilise stretch.
Frame Rate
If the particle is set to animate then you can use this attribute to control how fast it animates over the lifetime of the particle.
Velocity Adjuster
This attribute scales the speed of all particles currently in existence. The x axis represents the number of seconds the effect has been alive for, so you can change the speed of all particles in unison for some cool effects.